
EurekaZone Track Saw Review
https://www.tool-rank.com/media/listing/photos/thumbnail/300x300s/1c/7b/b6/EurekaZone20Tracksaw20Review-33-1439756324.jpgOscillation tools seemed to top the list amongst DIYers this past year, but for many professionals, the step up to track saws was high on their list. Why track saws? Because they offer table saw quality and accuracy in a much smaller more portable tool. They also have the added benefit of being much safer to operate. Today I will be going over my experiences using the Eurekazone track saw system. Eurekazone sent over the EZ Smart Guide SGS-114" kit, which includes: (1) 64” rail, (1) 50” rail, (3) rail connectors, (1) Smart Base, (2) Smart Clamps, (2) AC-1 Anti-chip inserts, and (2) AC-2 Anti-chip inserts.
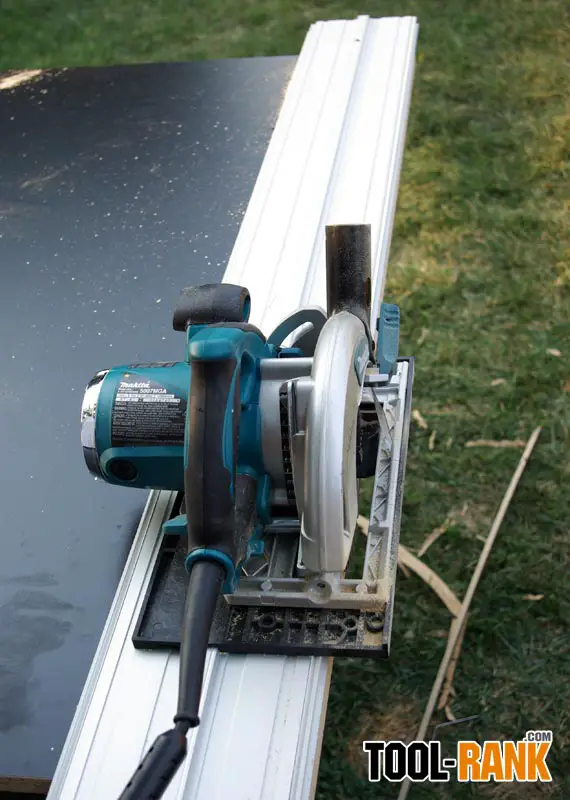
The Eurekazone system, as mentioned in previous articles, is the only track saw system that can be used with existing circular saws. This feat is accomplished by mounting the EZ Smart Base to the bottom of your saw, which then rides on the EZ rail/track. This means you can use a saw you already own with little modification, you can use a new saw with little modification, or you can purchase a pre-modified EZ Ready Saw directly from EZ. EZ will also custom make Smart Bases for any size saw, so using a 16” circular saw is not out of the question (Yes, they do exist).
 The entire EZ System uses a proprietary track (not compatible with other track systems), which comes in lengths ranging from 18” all the way up to 106”. You can also special order longer lengths if needed, but the simplest way to get long tracks is to use the Self Aligning Connectors to connect any two or more tracks together. On each side of the track you will notice an anti-chip edge; this replaceable edge provides anti-chipping on the rail side of the cut. The track has 2 continuous slots on the bottom that run the entire length. These slots are used in conjunction with the Smart Clamps and allow the track to be clamped to the cutting material. The same slots are also used for joining two or more tracks together and for other EZ accessories.
EurekaZone Tracksaw Setup
Mounting the Smart Base to a circular saw is simple, and EZ has videos on the internet that document the entire process. The most important step when attaching the Smart Base is to make sure that when fully attached, it will cut or at least make contact with the anti-chip edge. This is important because a tight custom cut is needed to provide the best anti-chip results. Most 7-1/4” saws have a blade offset of about 1-1/2” and you can simply butt the edge of the Smart Base to your saw and everything will be fine. If you do need to make an adjustment, there are two set screws that simplify the task. The next step is to make sure the saw blade and the Smart Base are parallel with each other. You can use the set screws again for this process. After you have everything where you want it, you can then clamp and screw the base to your saw. The whole process is simpler then it sounds, but you can always buy an EZ Ready saw if you are not up to the task. EZ Ready saws come with the base pre-installed and the saws are also modified to use a dust port and shield which makes dust collection more efficient.
 The Smart Base also features a special slot that allows for the use of two types of anti-chip inserts. These function the same way as zero clearance inserts which are commonly used with table saws. The first anti-chip insert is used while the saw is on the track, and adds anti-chipping to the cutoff side of the cut. This, plus the anti-chip edge, provides anti-chipping to both sides of the cut. The second insert has a completely flat bottom, and is needed when making angled cuts on the track, or when making cuts without the use of the track. It also provides anti-chipping to both sides of the cut.
Before we are ready to make our first cut we need to make a cut through the anti-chip insert and the edge. This is so we can make that custom fit I mentioned earlier. To do this you need to make a plunge cut through your anti-chip inserts. Next, we need to clamp down the track to some scrap wood and make a cut through the anti-chip edge along the entire length of the track on one side. The other side of the track will be used for cutting miters.
My Thoughts On The EurekaZone Tracksaw
 Now that I have the setup and the basics covered I can get on to my thoughts on the system starting with the track. The first thing I was impressed with was the rigidity of the track. There was little flex up and down, and no flex that I could see from side to side. Even after connecting both tracks to their full 114” there was very little flex up and down and maybe 1/16” from side to side. A 1/16” of movement from side to side might concern you but it took quite a bit of sideways pressure that would never occur while pushing your saw forward on the track. To check this I took both a string line and a laser to an 8-foot cut to make sure everything was still straight and it was.
Connecting the two rails together was simple and the system was designed so that the rails self align when you use the connectors. One bit of caution is to never over tighten the set screws on the connectors. If you are the type of person that likes to crank down on everything, you will put dimples in the rail. It only takes a snug fit, and everything will hold together just fine. While connecting the rails together is simple, it still takes a minute to connect them; so I suggest that if you can afford it and you need to do production work, you pick up a rail in every size you need.
 A track system that works with every saw it great, but it does have its trade offs. Because of the thickness of the rail, plus the thickness of the Smart Base, you do loose about 15/16” out of the saws total cutting depth. That being said, you can always move up to a bigger saw and your total cost will still be less then other track saw systems. The Makita 8-1/4” is a common choice to use with the Eurekazone system for people looking for more cutting depth.
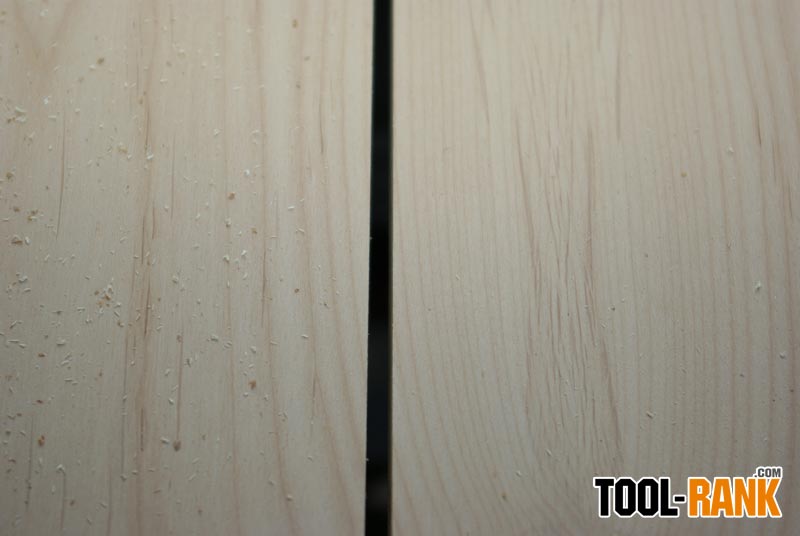
The cuts from the EZ system were great. My Father happened to be building an entertainment center at the time, so we were able to test its cutting and anti-chipping capabilities on both melamine and alder plywood. There was very little chipping on the melamine, and considering I was not using a melamine blade, the results were great. There was no chipping that I could see on the alder plywood cut. Usually one side of your material will cut cleaner on a circular saw, but with the EZ system both sides of the plywood came out great. One thing that allows the saw to perform as well as it does is the tight fit between the base and the rail and the anti-chip insert. Of coarse the biggest plus with any track saw is the ability to line the track up directly with your cut line without the need to measure for offsets. This feature alone is worth the price of the saw and will not only save you time, but it will reduce the number of mistakes that can be made. Just mark for your cut, line up the anti-chip edge with that mark, clamp your track and you are ready to go.


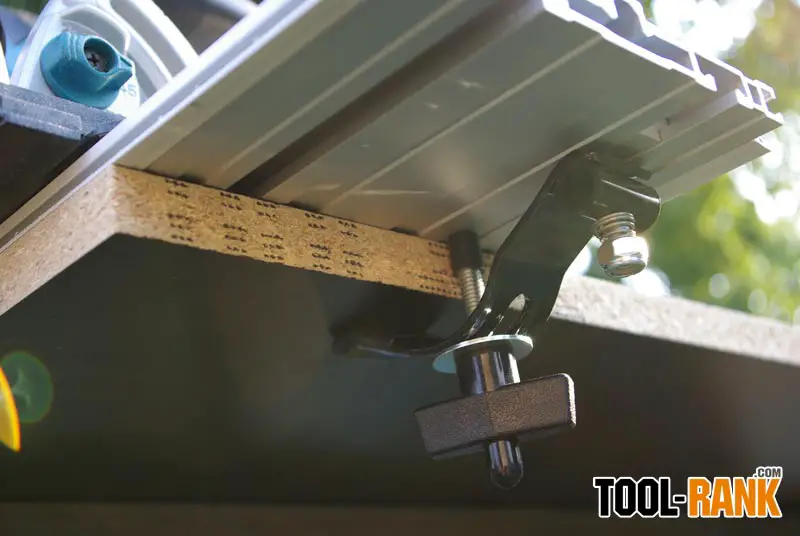
This might sound minor to some, but I really like the clamps that come with the kit. They chose not to use the standard F style clamp, instead used something completely different. The main reason I liked them was because they took the awkward twisting motion away from your wrists. As someone with an old injury to one of my wrists, I can really feel the difference. The clamps also feature a larger clamping surface that is completely covered in protective rubber, so you will never have to worry about damage. Another added benefit with this style camp is that you can leave them on the track for storage even if it is stored vertically.

The EurekaZone Smart Table
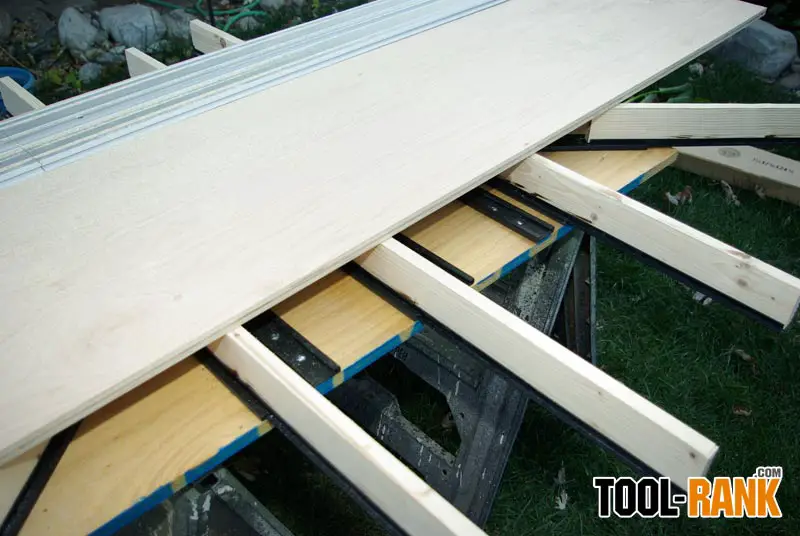
In addition to the track saw, EZ also sent over the Smart Table Top Kit. In my opinion this is something anyone that cuts sheet goods should get. This expandable table eliminates a lot of dangerous situations that can occur when cutting large sheet goods on saw horses. Awkward cuts that you would normally worry about are gone because pretty much the entire cutting surface is supported from underneath. The Smart Table Top Kit comes with all the hardware and all you need to supple is the plywood base, and the 1x sacrificial stock. Once everything is built, you can throw it on a couple saw horses, or you can mount it directly to some foldable table legs.


EurekaZone Tracksaw Review Conclusion
My overall impression of the system was great. Everything is very well engineered and made of high quality materials. The EZ track saw is just one part of the complete system that EurekaZone offers, and the system was designed to grow and be expandable as you need it. Not only will it work with circular saws, but EZ also has a router kit, and a number of accessories and jigs for both. Is the EurekaZone track saw better then the others on the market? I do not know, I have not used other systems, and one system might work better for someone then the other. The most important thing is that I found the EZ Smart Guide System to work exactly as advertised.
EZ Smart Guide Kits start at $127.16 for a 50” rail and the prices go up as the rails get longer. You will also need a saw if you do not already one own; which can be purchased from between about $125 - $200.